


PM5D/PM5D-RH V2 / DSP5D Owner’s Manual Reference section 179
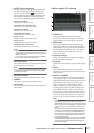
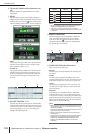
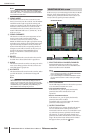
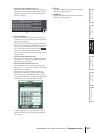
Information shown
in the display
Function
menu
Global
functions
Output
functions
Input
functions
Appendices
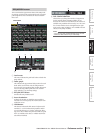
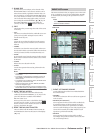
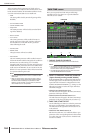
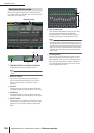
E MOVE UP
This button moves the currently selected event one
position earlier in the event list.
F MOVE DOWN
This button moves the currently selected event one
position later in the event list.
Note
• The MOVE UP/DOWN buttons are available only for events
whose EVENT TRIGGER field is shown as “[MANUAL]” or
the “ ” symbol.
• If the EVENT TRIGGER field of the selected event shows a
time code, these buttons will be grayed-out and unavailable.
G MANUAL INSERT
This button inserts a new event at the location selected
in the event list. The EVENT TRIGGER field of the
new event will be “[MANUAL],” and its SCENE TITLE
field will be “no assignment.” You can change these as
desired.
H MANUAL OVERWRITE
This button overwrites a new event onto the location
currently selected in the event list. (If the line at the
current location is blank, this button will be grayed-out
and unavailable.) The EVENT TRIGGER field of the
new event will be “[MANUAL].”
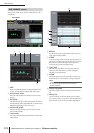
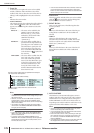
I TIME CODE SETUP
Here you can make settings for the time code received
by the PM5D.
• TC SOURCE (Time code source)
Select one of the following as the time code source that
will be used.
OFF . . . . . . . . . .Time code will not be received.
INTERNAL . . . . The time code generated within the
PM5D will be used.
TIME CODE . . .The time code (LTC) received via
the rear panel TIME CODE connec-
tor will be used.
MIDI . . . . . . . . . The MIDI time code (MTC)
received via the rear panel MIDI IN
connector will be used.
USB . . . . . . . . . .The MIDI time code received from
the specified port via the rear panel
USB connector will be used.
SLOT 1–4 . . . . .If a card that supports MIDI input
is installed in one of the rear panel
slots, the MIDI time code received
from the specified port will be used.
Note
• This setting does not affect the MIDI REMOTE function MIDI
SETUP screen.
• If you select USB or SLOT 1–4, you will need to specify the
port number (1–8) in the field on the right (Depending on the
card that is installed, some slots may have only one port.)
• If you switch to INTERNAL, the time code will be set to the
Start Time value.
• FRAME RATE
Select one of the following as the frame rate for the
time code (LTC, MTC, internal time code) you are
using.
30 . . . . . . . . . .30 frames/second (non-drop)
30D . . . . . . . . .30 frames/second (drop frame)
29.97 . . . . . . . .29.97 frames/second (non-drop)
29.97D . . . . . .29.97 frames/second (drop frame)
25 . . . . . . . . . . 25 frames/second
24 . . . . . . . . . . 24 frames/second
• OFFSET TIME/START TIME
If INTERNAL is selected as the time code source, use
this field to specify the time at which internal time code
will begin (START TIME).
If any other time code source is selected, use this field
to specify the offset (OFFSET TIME). The offset is the
interval by which the timing at which scenes are
recalled is adjusted backward or forward relative to the
incoming time code (LTC or MTC).
In either case, you can edit the value by clicking the
button and specifying the value in hours/minutes/sec-
onds/frames units in the window that appears.
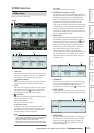
J Time code display area
This displays the value of the incoming time code (LTC
or MTC) or the internal time code. If INTERNAL is
selected as the time code source, transport buttons are
shown immediately below the time code value; you can
use these buttons to rewind, stop, or start the internal
time code.
In addition, if INTERNAL is selected you can click the
button to access the TIME CODE window, and
specify the time code directly.
Note
An offset value is not added to the displayed time code.
K TIME CODE INSERT
This button registers the time code data in the list in
realtime. When the time code source is running, click-
ing this button will capture the time code value and
add it as a new event. The captured time code is input
in the EVENT TRIGGER field of the new event, and
the SCENE TITLE field will be “no assignment.” At this
time, the events within the list are sorted in descending
order of time code. (If an event exists at the same time
location, it will be overwritten by the new event.)
Note
If the time code source is OFF, the EVENT TRIGGER column
will be “[MANUAL].” If the time code source is TIME CODE,
MIDI, USB, or SLOT 1–4, the offset value has been added to
the time code value of the newly added event.
L TIME CODE OVERWRITE
This button replaces the time code of the event selected
in the list in realtime. When the time code source is
running, clicking this button will write the current time
location as the time code value of the currently selected
event. (The SCENE TITLE field will not change.) At
this time, the events within the list are sorted in
descending order of time code.
If a blank line is selected, this button is grayed-out.
RETURN TO START TIME
(rewind the time code to
the start time)
START
(start the time code
from the current
location)
STOP
(stop the time code)