


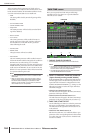
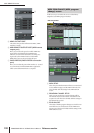


MIDI REMOTE function
192 PM5D/PM5D-RH V2 / DSP5D Owner’s Manual Reference section
multiple MIDI channels according to the assignments
in the list (
4).
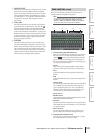
C ECHO ON/OFF
This selects whether control changes received from an
external device are echoed-out from the MIDI trans-
mission port. This item is linked with the settings in the
MIDI SETUP screen.
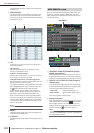
D List
In this list you can view/select the events assigned to
each control number.
• CH (Channel)
Indicates the MIDI channel on which the control
change is transmitted/received.
• CTRL No. (Control number)
Indicates the control number 0–119. Control numbers
0, 32, and 96–110 cannot be specified.
• CTRL CHANGE EVENT (Control change event)
Indicates/selects the type of event assigned to the corre-
sponding channel / control number.
To make an assignment, click the desired line (that line
will be highlighted in the center of the list); then click
the button at the left of the CTRL CHANGE
EVENT field to open the MIDI CTRL CHANGE
SETUP window. In this window you can specify the
parameter in three levels (mode, parameters 1/2).
When a control change on the corresponding MIDI
channel is received, the event assigned to that control
number will be edited. In addition, the corresponding
control change will be transmitted when this event is
edited on the PM5D.
Note
This list is ignored if the control change mode is set to NRPN.
E PRESET
Clicking this button will restore all event assignments
in the list to their default state.
F CLEAR ALL
Clicking this button will delete all event assignments in
the list.
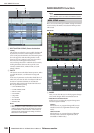
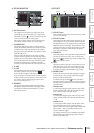
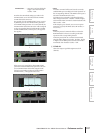
Here you can assign MIDI messages to panel faders, CH
[ON] keys, encoders, and ENCODER [ON] keys, and
make settings for the MIDI Remote function used to con-
trol external devices.
A TRANSMIT ENABLED/DISABLED (Enable/
disable transmission)
Enables/disables the MIDI Remote function. You can
enable/disable this function for each of the four banks
(memories in which MIDI Remote settings are stored).
B ASSIGN TO CH STRIP SECTION (Assign to
channel strip)
You can choose the following two as the channel strip
to which the MIDI Remote function is assigned (both
can be selected simultaneously if desired).
INPUT CH . . . . . . . INPUT channel strip 1–24
STIN/FXRTN . . . . . ST IN/FX RTN channel strip 1–
4
This setting applies to all four banks.
C Channel selection
Select the MIDI Remote channel for which you want to
make settings. When you click the / buttons at the
left and right of the box, the corresponding name is
displayed in the box at the right. You can change the
name by clicking the button of the right box.
Note
You cannot change the MIDI Remote channel you’re editing
while any of the LEARN buttons (
7
) are on. You will have to
turn off the LEARN button first.
4
5 6
MIDI REMOTE screen
MIDI REMOTE
1 2
3