


PM5D/PM5D-RH V2 / DSP5D Owner’s Manual Operating section 109
13
Meters
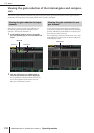
Switching the metering point
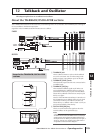
The metering point for the level meters (i.e., the position at which the level is detected) can be specified separately for input
channels and output channels.
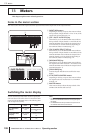
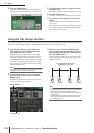
Here’s how to specify the metering point for input chan-
nels and ST IN/FX RTN channels.
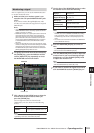
1
In the DISPLAY ACCESS section, repeatedly
press the [METER] key to access the INPUT
METER screen.
2
Click the / buttons at the left and right of
the METERING POINT box to choose one of
the following metering points.
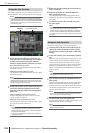
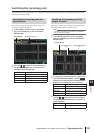
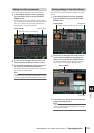
Here’s how to specify the metering point for output chan-
nels, MONITOR channels, and the CUE bus.
Hint
The metering point setting for the CUE bus is independent
from the other output channels.
1
In the DISPLAY ACCESS section, repeatedly
press the [METER] key to access the OUTPUT
METER screen.
2
To specify the metering point for output chan-
nels and MONITOR channels, click the /
buttons at the left and right of the METERING
POINT box to choose one of the following.
3
To specify the metering point for the CUE bus,
click the / buttons at the left and right of
the CUE METERING POINT box to choose one
of the following.
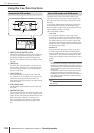
PRE ATT Immediately before the attenuator
PRE GATE Immediately before the internal gate
PRE FADER Immediately before the fader
POST FADER Immediately after the fader
POST ON Immediately after the [ON] key
Specifying the metering point for
input channels
INPUT METER METERING POINT box
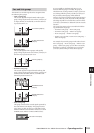
PRE EQ Immediately before the EQ
PRE FADER Immediately before the fader
POST FADER Immediately after the fader
POST ON Immediately after the [ON] key
POST DELAY Immediately after the internal delay
PRE DELAY Immediately before the internal delay
POST DELAY Immediately after the internal delay
Specifying the metering point for
output channels
OUTPUT METER
METERING POINT
box
CUE METERING POINT
box