


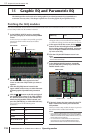

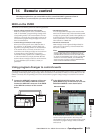


15 Graphic EQ and Parametric EQ
122 PM5D/PM5D-RH V2 / DSP5D Owner’s Manual Operating section
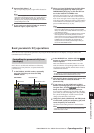
You can use the keys and encoders in the SELECTED
CHANNEL section of the panel to operate the parametric
EQ.
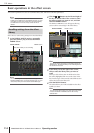
1
In the DISPLAY ACCESS section, repeatedly
press the [GEQ] keys to access the GEQ
PARAM screen.
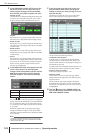
2
In the MODULE box, click the left/right /
buttons to select the GEQ module that you
want to operate.
Make sure that the EQ ON/OFF button is on. Also
make sure that the corresponding module is inserted
into the appropriate channel, and that insert in/out is
enabled for that channel.
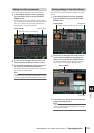
Hint
If the GEQ PARAM screen is displayed, pressing the [SEL]
key of the channel in which the GEQ module is inserted will
recall the corresponding GEQ module to the screen.
3
Click the PEQ button located in the upper mid-
dle of the screen to select the 8-band
parametric EQ.
4
Click the ASSIGN TO SELECTED CH field ON
button to turn it on.
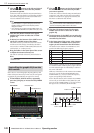
5
Use the SELECTED CHANNEL section EQUAL-
IZER controls to control the parametric EQ.
At this time you won’t be able to operate the
SELECTED CHANNEL section other than EQUAL-
IZER. For details on using the SELECTED CHANNEL
section, refer to p.65.
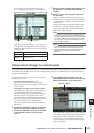
Hint
• GEQ module settings are saved as part of the scene. You
can also save desired GEQ module settings in a library. For
details, refer to the Reference section GEQ LIBRARY
screen
(
➥
p.174)
.
• When the display switches to another screen, the UPPER or
LOWER assignments are forcibly defeated, and you won’t
be able to operate this even if you once again access the
GEQ PARAM screen. However if you leave the ASSIGN TO
SELECTED CH field’s AUTO ASSIGN button on, the previ-
ously-operated band will automatically be assigned to the
SELECTED CHANNEL section when you access the GEQ
PARAM screen.
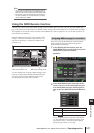
Controlling the parametric EQ from
the SELECTED CHANNEL section
MODULE box EQ ON/OFF button
GEQ PARAM
GEQ/PEQ button
SELECTED CHANNEL section