


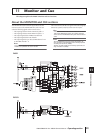


12 Talkback and Oscillator
106 PM5D/PM5D-RH V2 / DSP5D Owner’s Manual Operating section
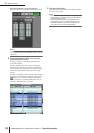
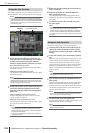
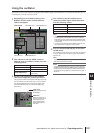
Using talkback
Here’s how the talkback signal input from the TALKBACK jack can be sent to the desired bus(es).
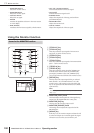
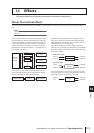
1
Repeatedly press the [MON/CUE] key of the
DISPLAY ACCESS section until the TALKBACK
screen appears.
Note
If you select the DSP5D when cascade-connected to the
DSP5D, the TALKBACK IN field will not be displayed.
2
Turn the TALKBACK [LEVEL] knob to adjust the
input sensitivity of the talkback mic.
The meter in the TALKBACK IN area indicates the
input level of the mic connected to the TALKBACK
jack. If you want phantom power (+48V) to be sup-
plied to the TALKBACK jack, turn on the +48V button
located in the TALKBACK IN area.
Hint
The INPUT TO TALKBACK area also lets you use any INPUT
jack 1–48 as a supplementary input for talkback.
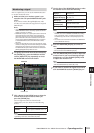
3
Click a button in the BUS ASSIGN area to spec-
ify the bus(es) to which the talkback signal will
be sent (multiple selections are allowed).
These buttons correspond to the following buses.
Hint
If desired, the talkback signal can also be output directly from
an output channel of slot 1–4 or from 2TR OUT DIGITAL jacks
1–3. To do so, click the PATCH button in the TALKBACK
OUT area to access the OUTPUT PATCH screen, and patch
talkback to the jack you want to use for direct output.
4
To enable talkback, press the TALKBACK [ON]
key in the TALKBACK section of the panel to
turn it on.
The TALKBACK [ON] key can operate in either of the
following two ways, depending on the setting of the
NEVER LATCH button in the TALKBACK area.
• If the NEVER LATCH button is off
Talkback will be switched on/off each time you press
the TALKBACK [ON] key (Latched). However if you
press and hold down the TALKBACK [ON] key, talk-
back will remain on only while you continue holding
down the key, and will turn off when you release the
key (Unlatched).
• If the NEVER LATCH button is on
Talkback will be on only while you continue holding
down the TALKBACK [ON] key, and will turn off
when you release the key (Unlatched).
Hint
• The TALKBACK [ON] key of the panel and the TALKBACK
ON/OFF button in the screen are linked. The setting of the
NEVER LATCH button also affects both of these. However if
the NEVER LATCH button is off, holding down the on-
screen TALKBACK ON/OFF button will cause Latched
operation.
• When talkback is on, you can use the talkback dimmer to
lower the monitor levels other than talkback (
➥
p.239).
• You can also assign the talkback function to a user-defined
key (
➥
p.208).
MIX 1–24 buttons MIX buses 1–24
MATRIX 1–8 buttons MATRIX buses 1–8
STEREO AL/R STEREO A bus L/R channels
STEREO BL/R STEREO B bus L/R channels
TALKBACK BUS ASSIGN areaTALKBACK area
INPUT TO TALKBACK area TALKBACK OUT area