


Using the included Restore CDs to restore the system and factory sounds EXB-DI option
1043
Using the included Restore CDs to restore the system and factory sounds
If for some reason the OASYS will not start up
normally, or some other problem occurs, you can use
the included set of Restore CDs to return the OASYS to
its factory-preset state.
Important - save your data before proceeding!
All of the Restore functions will erase all of the
Programs, Combis, Drum Kits, Wave Sequences, and
Global settings in the internal memory. Some of the
functions will also erase data from the FACTORY
directory on the hard drive, or even erase the hard
drive entirely, as detailed below.
If you have any data that you want to keep–including
data stored on the hard drive as well as data in the
internal memory–we strongly recommend that you
save it to a CD-R/RW disk, or to external USB media,
before proceeding. For instance, use the Save All or
Save .PCG commands to save the contents of the
internal memory.
Contents of the Restore CDs
Restore CD 1/4
This is the only CD with user-readable data, as
described below. In addition to the data used for the
restore functionality, it contains the following
directories and files:
• FACTORY directory: This contains the file
PRELOAD.PCG, which is a backup of the
preloaded Program, Combination, Wave Sequence,
Drum Kit, and Global Setting data. This file is used
by the Restore feature, but you can also load it
directly in Disk mode.
• licenses directory: This contains the Korg OASYS
software license, in both English and Japanese,
along with notes about the use of open-source
software.
• src directory: This contains the open-source GPL
and LGPL licenses (in English), along with the
applicable source code.
• manuals directory: This contains various OASYS
documentation, such as update notes, the full Voice
Name List (VNL), manuals, etc.
NOTE: The files in the licenses, src, and manuals
directories can only be read from a computer; they
cannot be used directly on the OASYS.
Restore CDs 2/4, 3/4, and 4/4
These CDs are only for use by the restore functionality,
and do not include any user-readable data.
Restoring the OASYS factory data
You can use the Restore function to restore the factory
sounds (Programs, Combis, etc.), to initialize the
internal memory, or to restore the operating system to
its original state. These three options will not alter any
user data stored on the disk, as long as it is not stored
in the FACTORY folder.
If absolutely necessary, you can also re-format the
entire internal hard disk, and then restore the
operating system and factory sounds. This will destroy
all user data on the internal hard disk, and require re-
authorization of the OASYS before it can be used
again–so be careful!
To use the Restore function:
1. Disconnect all external USB devices from the
OASYS.
External USB devices may interfere with the
restoration process.
2. Turn on the OASYS.
3. Insert Restore CD 1/4 into the CD-R/RW drive.
If the disc tray does not open, use a straightened
paper-clip (or a similar object, about 1mm in
diameter) and push it gently but firmly into the
manual eject hole. The disc tray will be forced open.
4. Turn off the OASYS. Wait for about ten seconds,
and then power-on again.
Be sure to wait for about ten seconds before you
turn on the power.
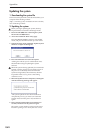
5. A dialog box will appear. Use the /
switches or the VALUE dial to choose one of the
following options:
[ ] Restore OS and factory sounds
[ ] Restore factory sounds
[ ] Initialize Internal Memory
[ ] Format HD, and then restore OS and factory
sounds
See below for complete descriptions of each option.
6. Press the ENTER button to carry out the selected
Restore function, or press EXIT to stop the process
without altering any data.
After pressing ENTER, an “Are you sure?” message
will appear. If you are sure you want to proceed,
press the ENTER switch again. You can also cancel,
without altering any data, by pressing the EXIT but-
ton.
7. After pressing ENTER, the restore program will
start up. Follow the instructions that appear in the
screen.
You’ll be asked to insert different CDs, depending
on the option you chose in step 4. Each time a CD is
requested, insert the appropriate CD, and then press
the ENTER switch. The entire process may take
some time.
Do not touch the front-panel controls or turn off the
power while the Restore is underway, except for
pressing ENTER and EXIT as prompted by the on-
screen instructions.
8. When the restore operation is complete, the
following message will appear:
Restore Complete - OK
Please remove CD, and turn off the power.
If an error occurs, you’ll see the following message
instead:
Restore did not complete successfully. Please try
again.
In this case, start again at step 3.