


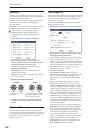

Sequencer mode
528
Stereo Pair
This lets you assign adjacent audio tracks as a stereo
pair. The following parameters of paired channels will
be linked with the same values.
Volume, Pan, Send1, Send2, EQ (Bypass, Input Trim,
Low Gain, Mid Cutoff, Mid Gain, High Gain),
Play/Rec/Mute
In addition, you can use the P4: Track Edit page menu
commands to edit paired tracks simultaneously.
Paired channels are controlled by the odd-
numbered knob or slider. Moving the even-
numbered knob or slider will not control the
channels.
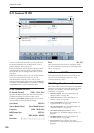
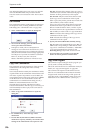
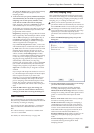
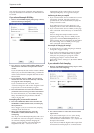
1. Select “Stereo Pair” to open the dialog box.
2. Use “Audio Track 1&2,” “3&4,” “5&6,” “7&8,”
“9&10,” “11&12,” “13&14,” and “15&16” to specify
the audio tracks that you want to pair.
Uncheck audio tracks that you want to un-pair.
3. Specify the “Pan Mode.”
Individual: The pan of the two channels will
operate independently.
Balance: The pan of the two channels will operate
as a balance control.
4. To apply the changes you made, press the OK
button. If you decide to cancel, press the Cancel
button.
Optimize RAM
This command optimizes the RAM memory. When
you execute this command, unused memory areas will
be reorganized, allowing the full amount of remaining
to be used. For more information, see “Optimize
RAM” on page 139.
Select Sample No.
This command specifies the sample number into which
samples will be written. You can also specify whether
the sample will be automatically converted into a
program after sampling.
Note: Select Sample No. can be selected if you have
chosen RAM for “Save to.”
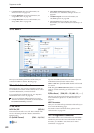
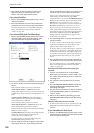
1. Choose Select Sample No. to open the dialog box.
2. In “Sample No.,” choose a sample number where
the sampling will be performed.
By default, this will be the lowest-numbered of the
vacant sample numbers. If you select ----:---No
Assign--- or a sample number that already contains
data, the sample will automatically be sampled into
the lowest-numbered vacant sample number. If you
are sampling in stereo, “Sample No.(L)” and
“Sample No.(R)” will be created.
3. Set “Auto +12 dB On.”
On (checked): +12 dB (Sampling 2–1d) will
automatically be turned on for samples you record.
Samples for which +12 dB is on will play back
approximately +12 dB louder than if this setting
were off.
When you resample a performance in Program,
Combination, or Sequencer modes, you should
normally set Recording Level to about +0.0 (dB) so
that the recording level will be as high as possible
without clipping. When you resample, the sound
will be recorded at the optimum level for sampled
data, but the playback level at playback will not be
as loud as it was during the resampling process (if
+12 dB (Sampling 2–1d) is off). In such cases, you
can check the Auto +12 dB On check box when you
resample, so that +12 dB will automatically be on,
making the sample play back at the same level as
when it was resampled.
In these modes, the power-on default settings are
Recording Level at +0.0 (dB) and Auto +12 dB On.
If you resample a performance in the respective
mode with these settings, the sample will play back
at the same level at which it was resampled.
If you want to monitor your performance in
Program, Combination, or Sequencer mode, while
sampling only the external audio signal from
AUDIO INPUT etc., we recommend that you set
Recording Level to about +0.0 (dB) and turn off
Auto +12 dB On when you resample.
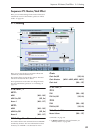
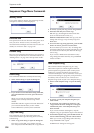
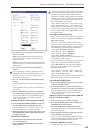
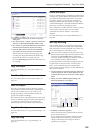
Pan 1 and 2 can be set
separately.
If you set pan knob 1 to L000,
pan knob 2 will be set to R127.
Pan knob 2 has no effect.
How tracks 1 and 2 behave when paired
Balance
Individual