


Sampling P4: EQ/Controller 4–8: Set Up Controllers
597
Mode [Toggle, Momentary]
Specifies how on/off operation will occur when you
press the SW1 switch.
Toggle: On/off will alternate each time you press the
SW1 switch.
Momentary: The assigned function will be on only
while you hold down the SW1 switch.
SW2 [Off, …, After Touch Lock]
Mode [Toggle, Momentary]
Assigns the function of the SW2 switch. The functions
that can be assigned to SW2 are the same as for SW1
except that SW2 Mod.:CC#81 replaces SW1
Mod.:CC#80. The rest is the same as for the SW1
switch.
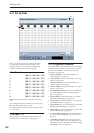
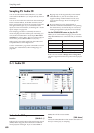
4–8b: Modulation Knob Assign
These settings assign the functions of realtime
modulation knobs 5–8. Most of the assignable
functions are types of control change. For details, see
“Realtime Knobs 5–8 Assignments” on page 980.
The functions you assign here will be controlled when
you operate realtime modulation knobs 5–8.
Knob 5 [Off, …, MIDI CC#119]
Knob 6 [Off, …, MIDI CC#119]
Knob 7 [Off, …, MIDI CC#119]
Knob 8 [Off, …, MIDI CC#119]
These controllers can be used to make realtime changes
in effect dynamic modulation functions etc. while you
sample.
Example settings)
In this example, we’ll use realtime modulation knob 5
to control the “Wet/Dry” parameter of the 079:
Stereo/Cross Delay assigned to IFX1, and use knob 6
to control the post-IFX “Pan.” Then we’ll sample an
audio signal from an external source while controlling
these parameters in realtime.
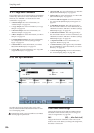
1. Set “Bus Select (IFX/Indiv.)” (0–8a) to IFX1.
2. Select 079: Stereo/Cross Delay for “IFX1.”
3. Set the IFX1 page “Wet/Dry” setting to Dry,
“Source” to Knob Mod.5[+], and “Amt” to +50.
4. In the Modulation Knob Assign area, assign
“Knob5” to Knob Mod.5 (CC#17) and “Knob6” to
Post IFX Pan (CC#08).
5. Rotate knob 5, 6 and the panning of the delay level
and the delay will change. You can sample the
sound while you modify it.
▼ 4–8: Page Menu Commands
The number before each command shows its ENTER +
number-key shortcut. For more information on these
shortcuts, see “ENTER + 0-9: shortcuts for menu
commands” on page 138.
• 0: Delete Sample. For more information, see
“Delete Sample” on page 615.
• 1: Copy Sample. For more information, see “Copy
Sample” on page 616.
• 2: Rename Sample. For more information, see
“Rename Sample” on page 616.
• 3: Move Sample. For more information, see “Move
Sample” on page 616.
• 4: Sample Mono To Stereo. For more information,
see “Sample Mono To Stereo (Change Sample
Type)” on page 617.
• 5: Delete MS. For more information, see “Delete
MS (Delete Multisample)” on page 617.
• 6: Copy MS. For more information, see “Copy MS
(Copy Multisample)” on page 618.
• 7: Rename MS. For more information, see “Rename
MS (Rename Multisample)” on page 618.
• 8: Move MS. For more information, see “Move MS
(Move Multisample)” on page 619.
• 9: Convert MS To Program. For more information,
see “Convert MS (Multisample) To Program” on
page 618.
• 10: MS Mono To Stereo. This will appear only if
the current MS is Mono. For more information, see
“MS Mono To Stereo/MS Stereo To Mono (Change
Multisample Type)” on page 619.
• 10: MS Stereo To Mono. This will appear only if
the current MS is Stereo. For more information, see
“MS Mono To Stereo/MS Stereo To Mono (Change
Multisample Type)” on page 619.
• 11: Optimize RAM. For more information, see
“Optimize RAM” on page 139.
• 12: Select Directory. This applies only when Save
to is set to Disk. For more information, see “Select
Directory” on page 140.
• 13: Auto Sampling Setup. For more information,
see “Auto Sampling Setup” on page 620.