


Sampling mode
568
Keyboard & Pads
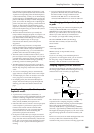
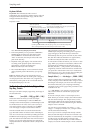
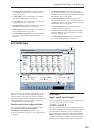
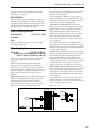
Keyboard: This indicates the index zone of
multisample, the original key, and the root key. The red
triangles indicate the keyboard range, and the white
triangle indicates the C4 key.
Keyboard & Pads
Note: The base key (displayed in blue)
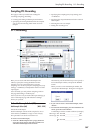
• In P1: Sample Edit you can press the SAMPLING
START/STOP switch to play the sample of the
selected Index in one-shot mode from “Start”–
“End.” At this time, the sample will sound at the
pitch of the base key.
• Playback in the grid display of P1 and P2 will be
according to the playback pitch of the base key
selected here, and the specified tempo
BPM/resolution (set in P1 and P2).
• The “Pitch BPM Adjust” menu command is based
on the playback pitch of the base key you specify
here.
Pads: By default, pads 1–8 are assigned to C2–G2.
When you choose an index to which a pad is assigned,
it is displayed in blue. The index zone, original key,
and base key of the pads can be viewed and edited in
the keyboard display or in 0–1b.
0–1b: Index, Sample Select, Original Key,
Top Key, Create
Here you can set the sample, original key, and range of
the selected index.
Index [xxx (001…128)/yyy (001…128)]
Selects the index for which you wish to sample.
Each zone in a multisample is called an Index. For
example on the 76 note keyboard, a multisample could
be divided into seven zones of one octave (12 keys)
each. Each of these zones is referred to as an Index.
You will assign a sample to each of these indexes.
xxx: The selected index. Choose the desired index.
yyy: The total number of indexes in the multisample.
Note: You can also select an index by holding down the
ENTER switch and playing a note on the keyboard or
pad. The index that includes this note will be selected.
The key you specify will be the base key, and will be
displayed in blue in “Keyboard & Pads” (“Keyboard &
Pads”).
This parameter can also be set from P1–P3:
Multisample. Sampling and editing in the respective
page will apply to the index that you select here.
Immediately after the power is turned on, this will be
001/008. This indicates that there are eight indexes,
and that currently the first index is selected.
To increase the number of indexes, use “Create” in this
page. When you press the Create button, indexes will
automatically be added from the left-most zone, as
002/002, 003/003, … (The position, zone width, and
original key location of the index that is created when
you press the Create button can be set in Create Zone
Preference (0–1e, 3–1c). You are also free to modify the
zone width and original key location later.)
Sample Select [----: ---No Assign----, 0000…3999]
Selects a sample that you sampled or loaded in Disk
mode, and play a note within the index range to sound
that sample. The sample you select here is the sample
that will be affected by your sampling and editing
operations in the various pages. This parameter is also
available in P1–P3.
----: ---No Assign----: No sample is assigned to the
index. There will be no sound when you play the
keyboard.
To record a sample, select a vacant sample such as
0000:. When you record a sample, data will be loaded
into the selected sample. The sample name (such as
NewSample_0000) will be shown beside the number.
This sample name can be modified using the “Rename
Sample” menu command.
You can also record a sample even when ----:---No
Assign---- is displayed. In this case, a sample number
will be selected automatically.
Even if you record to a sample that already contains
data, the selected sample will not be overwritten –the
data will automatically be sampled to a vacant sample,
and the newly recorded sample will replace the
previous sample in the index. If you wish to delete a
sample, execute the “Delete Sample” menu command.
Keyboard range
C4 key
Index02 Index03...Index08Index01
By holding down the ENTER switch and playing a note, you can select the corresponding
index, and the specified key will be the base key and will be shown in blue.
Pads 1...8 correspond to C2...G2.
If you hold down the ENTER switch and press a pad, that index
will be selected and displayed in blue.
Original Key (currently selected
Original Key is displayed in red)
Index zone (currently
selected Index is reversed)