Sampling: Page Menu Commands Time Slice
633
Use New BPM to specify the BPM value of the
sample you wish to create. The Ratio will
automatically be calculated from the Source BPM
and the New BPM values.
It is not possible to make settings that would cause
Source BPM or New BPM to exceed the range of
40.00–480.00.
It is not possible to make settings that would cause
Ratio to exceed the range of 50.00–200.00.
Press the Stretch button to execute Time Stretch.
When you execute the command, the time-stretched
samples will automatically be assigned to notes D2
and above of the keyboard, allowing you to
audition the sound. You can change Ratio and New
BPM as many times as desired and continue
auditioning the result.
When you audition the time-stretched samples, the
sound you hear is the sound of each divided sample
as it will be played in Sequencer mode. If there is
obtrusive noise or if the attack is not sound cleanly,
return to step 7 and adjust the “Start” and “End”
addresses, etc.
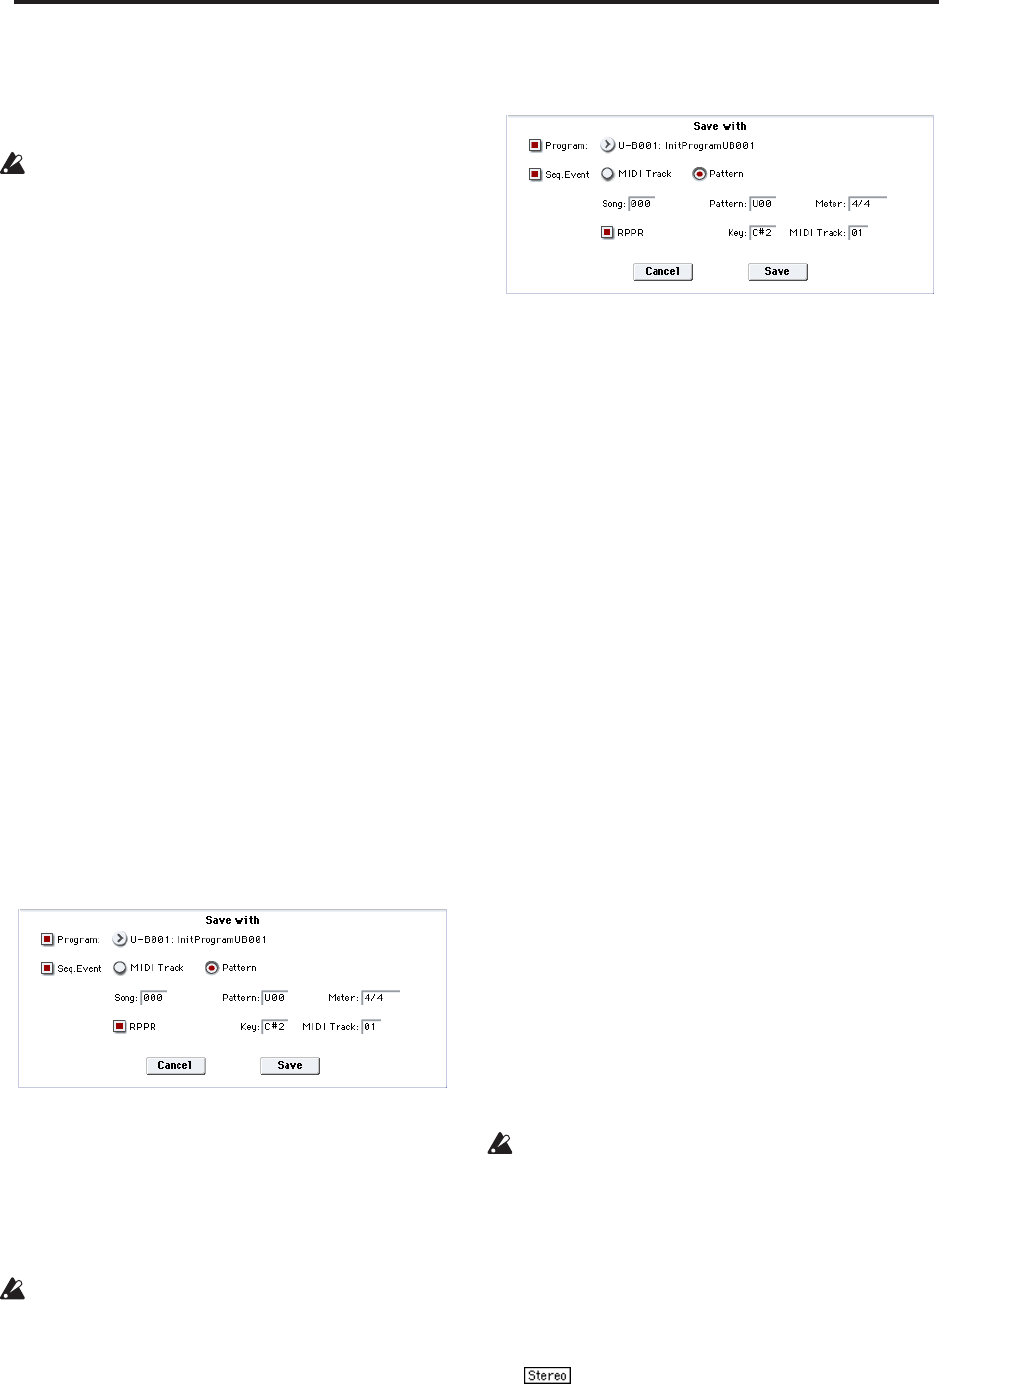
10.Set “Save with” to specify the data that will be
created simultaneously when you press the Save
button to save the samples
Program: If this check box is checked, the
multisample will be converted to a program when
you save it. Specify the destination program
number.
Seq.Event: If this check box is checked, sequence
data to play the sliced samples will automatically be
created after the data is saved.
You can specify whether the sequence data to play
back the sliced samples will be created as track data
or as pattern data. If pattern data is created, you can
also assign the pattern to RPPR.
If you choose the Track radio button, track data will
be created. Use Song, Track, and Meter to specify
the song number, track number, and time signature
of the data that will be created.
The track data that is created will start at the
measure specified by Start Measure, and will repeat
for the number of times specified by “Time.”
When track data is created, any data that had
existed within the specified range of measures will
be erased. Data outside this range will not be
erased.
If you check both Program and Seq.Event and select
the Track, the song parameter Program Select
(Sequencer 0–1b) will automatically be specified if
the Start Measure is 001. Also, a program change
will be created at the Start Measure location. In
Sequencer mode you can select the song and play it
back to hear the result immediately. Normally you
will check both of these boxes.
If you choose the Pattern radio button, pattern data
will be created.
Use Song, Pattern, and Meter to specify the song
number, pattern number, and time signature of the
data that will be created.
RPPR: If you check the check box, pattern data to
play the sliced samples will be assigned to RPPR
when you save. Use Key and Track to specify the
key and track that will be created.
If Program, Seq.Event, and RPPR are all checked,
the song parameters Program Select (Sequencer 0–
1c/2c) and
RPPR ON/OFF (Sequencer 0–1a) will
both be specified automatically. RPPR ON/OFF will
be turned on.
In Sequencer mode you can select the song and
pattern to play back the results immediately. If
RPPR is checked, pressing the specified key will
play the pattern. Normally you will check both of
these boxes.
Note: In some cases, the sample End address setting
etc. may increase the number of measures in the
pattern, so that it no longer loops precisely. In such
cases, re-specify the “Length” in the Sequencer
mode “Pattern Parameter” menu command.
Note: If you use Seq.Event and Start Measure 001,
the “Tempo” (0–1c) of the track data or pattern data
that is created will be the value specified by New
BPM if you executed Time Stretch. If you did not
execute Time Stretch, the tempo will be the value
specified for Source BPM.
If you set Start Measure to 001 and create a track,
and if a tempo event exists only at the beginning of
the master track, the tempo of that event will also be
the value that you specified as New BPM or Source
BPM.
If you save to a song that already contains data, the
time-sliced samples may not play back in the same
way as original sample if the time signature is
different. You must set a matching time signature in
the master track.
11.If you wish to save, press the Save button. If you
decide not to save, press the Cancel button. When
you save, the samples and multisample will
automatically be saved to vacant samples and
multisamples.
In the case of stereo samples, the samples and
multisample will be saved in stereo.
12.By repeating steps 6–11 you can create as many
samples and multisamples as desired.
13.Press the Exit button to exit the Time Slice
command.
