


Program P2: OSC/Pitch 2–2: OSC1 Pitch
55
• Set an initial amount of LFO modulation, using the
LFO 1/2 Intensity parameters.
• Use JS+Y to scale the amount of the LFO.
• Use any AMS source to scale the amount the LFO.
You can use each of these methods for each of the two
LFOs. The results are added together to produce the
total LFO effect.
LFO1
LFO1 Intensity [–12.00…+12.00]
This controls the initial effect of the LFO on the pitch,
in semitones, before any JS+Y or AMS modulation.
Negative (–) settings will invert the phase of the LFO.
JS+Y Intensity (LFO1 JS+Y Int.) [–12.00…+12.00]
Moving the joystick “up” from the center detent
position, away from yourself, produces the JS+Y
controller. You can use this to scale the amount of the
LFO applied to the pitch. This parameter sets the
maximum amount of LFO modulation added by JS+Y,
in semitones.
As this value is increased, moving the joystick in the
+Y direction will cause the OSC1 LFO1 to produce
deeper pitch modulation.
Negative (–) settings will invert the phase of the LFO.
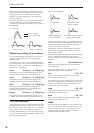
You can also use this to reduce the initial amount of the
LFO, as set by LFO1 Intensity, above. For example:
1. Set LFO1 Intensity to +7.00.
The LFO will now have a fairly strong effect on the
pitch, bending it by a perfect 5th.
2. Set JS+Y Intensity to –7.00.
Now, if you move the joystick up, the effect of the LFO
will fade away. When the joystick is all the way at the
top of its range, the LFO will be completely cancelled
out.
AMS (LFO1) [List of AMS Sources]
This selects any AMS modulation source to scale the
amount of the LFO applied to pitch.
For a list of AMS sources, see “AMS (Alternate
Modulation Source) List” on page 967.
Intensity [–12.00…+12.00]
This controls the depth and direction of the LFO AMS
modulation for pitch.
For example, if AMS is set to After Touch, positive
settings mean that aftertouch will increase the amount
of pitch modulation from LFO1.
LFO2
The parameters for LFO2 are identical to those for
LFO1. For more information, see the descriptions
under LFO1, above.
2–2d: Portamento
Portamento lets the pitch glide smoothly between
notes, instead of changing abruptly.
Enable [Off, On]
On (checked): Turns on Portamento, so that pitch
glides smoothly between notes.
Off (unchecked): Turns off Portamento. This is the
default state.
Fingered [Off, On]
This parameter allows you to control Portamento
through your playing style. When it’s enabled, playing
legato will turn on Portamento, and playing detached
will turn it off again.
This option is only available when Portamento Enable
is turned on.
On (checked): Turns on Fingered Portamento.
Off (unchecked): Turns off Fingered Portamento.
Mode [Constant Rate, Constant Time]
Constant Rate means that Portamento will always take
the same amount of time to glide a given distance in
pitch - for instance, one second per octave. Put another
way, gliding several octaves will take much longer
than gliding a half-step.
Constant Time means that Portamento will always take
the same amount of time to glide from one note to
another, regardless of the difference in pitch. This is
especially useful when playing chords, since it ensures
that each note in the chord will end its glide at the
same time.
Time [000…127]
This controls the portamento time. Higher values
mean longer times, for slower changes in pitch.
This option is only available when Portamento Enable
is turned on.
Assigning SW1 or SW2 to Portamento On/Off
You can use the two assignable switches, SW1 and
SW2, to turn portamento on and off.
To do so:
1. Go to the Program P1–Set Up Controllers page.
2. Under Panel Switch Assign, set either SW1 or SW2
to Portamento SW (CC#65).
Now, the selected switch will enable and disable
Portamento. It will also send the MIDI Portamento
controller, CC#65.
Even if you don’t assign SW1/2 to Portamento, you
can still use MIDI Controller #65 to turn Portamento
on and off.
▼ 2–2: Page Menu Commands
The number before each command shows its ENTER +
number-key shortcut. For more information on these
shortcuts, see “ENTER + 0-9: shortcuts for menu
commands” on page 138.
• 0: Write Program. For more information, see “Write
Program” on page 138.
• 1: Exclusive Solo. For more information, see
“Exclusive Solo” on page 138.
• 2: Copy Oscillator. For more information, see
“Copy Oscillator” on page 144.