


Program mode: HD-1
14
Again, the goal is to get the level as high as possible
without activating the CLIP! or ADC OVERLOAD!
messages.
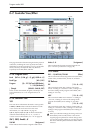
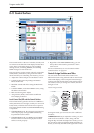
Tips for eliminating distortion when using the
analog inputs
If sound from the analog inputs is distorted, but the
CLIP! message doesn’t appear, it’s possible that
distortion is occurring at the analog input stage, or that
distortion is being caused by the settings of the internal
effects.
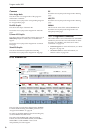
If the “ADC OVERLOAD!” message appears above the
Recording Level meters, the distortion is due to
excessive levels at the input. In this case, either lower
the output level of the external audio source, or (for
inputs 1 and 2 only) adjust the MIC/LINE gain select
switch and LEVEL knob so that this message does not
appear.
If there is distortion, but the “ADC OVERLOAD!”
message does not appear, it’s possible that the
distortion is being caused by the settings of the internal
effects. To solve this problem, either lower the input
Level (see “Level,” above), or adjust the effects settings
(such as changing the individual effect Input Trim
parameters).
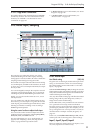
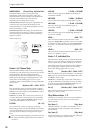
0–8c: Sampling Setup
Source Bus [L/R, REC1/2 & 3/4,
Audio Input1/2 & 3/4,
S/P DIF L/R, Indiv.1/2…7/8]
You can sample in stereo from any pair of audio
inputs, from the two stereo REC busses, or from the
signal at any of the 10 outputs (L/R and Individual
1/2-7/8).
When you sample from an output pair or REC bus,
you’ll record all audio sent to the output or bus,
including internal Programs or Combis, effects, audio
inputs, and HDR audio.
When sampling in stereo, the odd-numbered channel
(such as 1, 3, 5, or 7) corresponds to the left channel,
and the even-numbered channel (such as 2, 4, 6, or 8)
corresponds to the right.
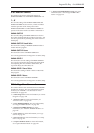
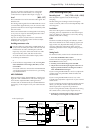
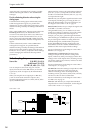
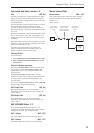
L/R: This lets you sample the signal heard at the main
L/R outputs, including any processing by TFX 1/2.
This is the default setting. For more information, see
the diagram “Source Bus = L/R” on page 14.
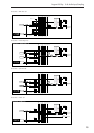
REC1/2, REC3/4: These let you sample the signals sent
to the REC 1/2 or REC 3/4 busses.
Using the REC busses, you can isolate one or more
sounds for recording or sampling–even if the sounds
are also being mixed into the main outputs. For
example, you can play a guitar through OASYS IFX
while listening to a KARMA drum phrase, and record
the processed guitar without recording the drums.
Individual Programs, Combi Timbres, Sequencer
Tracks (both MIDI and Audio), audio inputs, and
Insert Effects can all be routed to the REC busses, in
addition to their main output/IFX bus settings.
For more information, see the diagram “Source Bus =
REC Bus 1/2” on page 15.
Audio Input 1/2, Audio Input 3/4: Choose these
settings to sample directly from the analog audio
inputs, without any other processing by OASYS. The
settings on the Audio Inputs mixer, including volume,
pan, busses, sends, mute, and solo, will have no effect
on the recorded audio.
For more information, see the diagram “Source Bus =
Audio Input 1/2” on page 15.
S/P DIF L/R: Choose this setting to sample the S/P DIF
input directly, without any other processing by
OASYS. The settings on the Audio Inputs mixer,
including volume, pan, busses, sends, mute, and solo,
will have no effect on the recorded audio.
For more information, see the diagram “Source Bus =
S/P DIF L/R” on page 15.
Indiv.1/2…7/8: This lets you sample the individual
output busses. For more information, see the diagram
“Source Bus = Indiv. 1/2” on page 15.
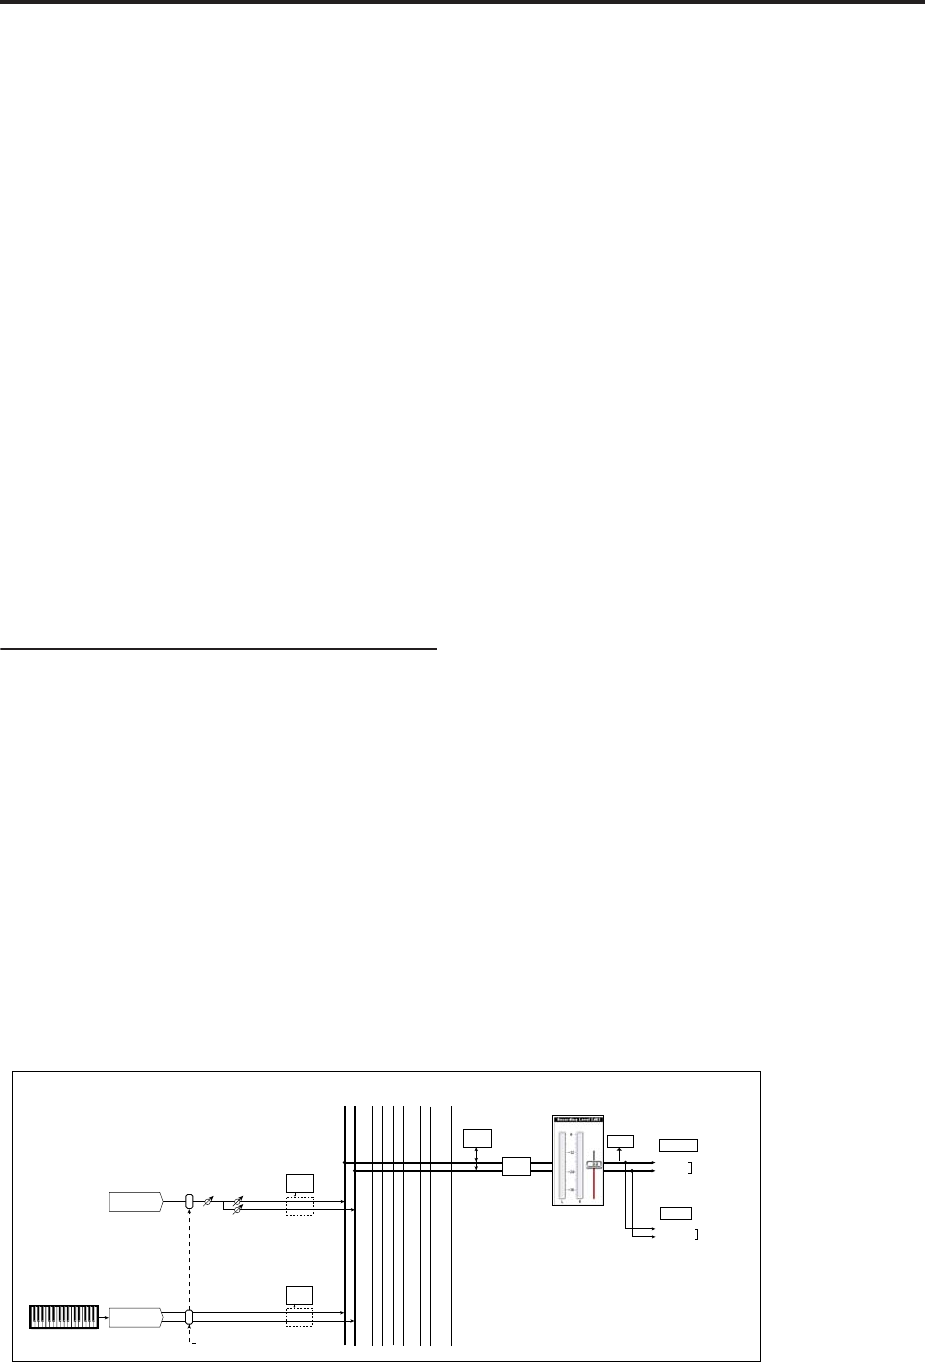
Source Bus = L/R
L-Mono
R-Mono
Stereo
Level Pan
Insert
Effects
CLIP !!
L/MONO
Source Bus = L/R
R
AUDIO OUTPUT
HEADPHONES
Insert
Effects
L/R
Bus
REC
1/2
REC
3/4
...
Indiv.
1/2
3/4 5/6 7/8
Bus = L/R or IFX1-12
Audio Inputs
OSC
Total
Effects
Master
Effects
Sampling
Monitor