


Sequencer P8: Insert Effect 8–6: Track View
517
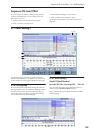
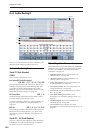
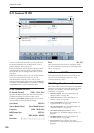
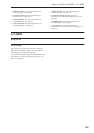
8–6: Track View
8–6a: Track View
Here you can view the track output and insert effect
routing.
Used in Tracks
The upper and lower rows of boxes with eight boxes in
each row indicate the timbre that is being sent to the
corresponding insert effect.
• The eight upper boxes correspond to MIDI tracks
1–8, and the eight lower boxes correspond to MIDI
tracks 9–16.)
• The eight upper boxes correspond to audio tracks
1–8, and the eight lower boxes correspond to audio
tracks 9–16.)
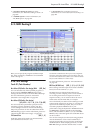
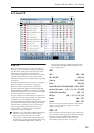
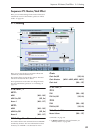
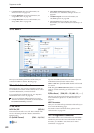
Track Select [Timbre 01…Timbre 16]
Here you can select the MIDI tracks 1–16 and audio
tracks 1–16 that will be shown in the Track View
screen.
The screen shows the insert effect(s) used by the
selected track.
Slot [IFX1…IFX12]
This indicates the slot number, effect type, effect on/off
status, and control channel for the chained insert
effects.
The selected slot is shown in dark blue. In the
“Selected” area below, you can specify the “Effect
Type” and “On/Off” status of the selected effect slot.
This is also the effect slot that will be affected by the
page menu commands “Insert IFX Slot” and “Cut IFX
Slot.”
When you move from this page to the P8– IFX1-12
page, the IFX you selected here will be selected.
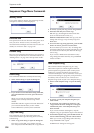
For example, if you select Track 03, only the insert
effects used by track 3 will be shown.
“OUTPUT” indicates the Bus Select settings that follow
the insert effect. This tells you the output destination to
which the audio signal will be sent.
8–6b: Selected
Here you can specify the “Effect Type” and “On/Off”
status of the insert effect slot selected by Track Select.
(“8–6a: Track View,” above)
▼ 8–6: Page Menu Commands
The number before each command shows its ENTER +
number-key shortcut. For more information on these
shortcuts, see “ENTER + 0-9: shortcuts for menu
commands” on page 138.
• 0: Memory Status. For more information, see
“Memory Status” on page 524.
• 1: Exclusive Solo. For more information, see
“Exclusive Solo” on page 138.
• 2: Copy Insert Effect. For more information, see
“Copy Insert Effect” on page 149.
• 3: Swap Insert Effect. For more information, see
“Swap Insert Effect” on page 150.
1–1b
8–6a
8–6PMC8–5b