


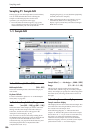
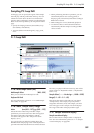


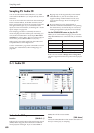

Sampling P3: Multisample Edit 3–1: Multisample Edit
593
Since in Sampling mode the playback unity level
will normally be the maximum level, adjustments in
the + direction will have no effect. If Volume
(CC#07) or Expression (CC#11) has been assigned
to the ASSIGNABLE PEDAL or as the Realtime
Modulation knob 5–8 and these controllers have
been operated, or if these MIDI messages have been
received to lower the playback unity level, then
adjustments in the + direction will be valid.
(Program, Sample Parameters: Level)
Note: The playback level will also be affected by the
+12 dB (2–1d) setting. If +12 dB is on, the sample will
play back approximately +12 dB louder.
Pitch (BPM Adj. In Page Menu) [–64.00…+63.00]
Adjusts the playback pitch of the sample in one-cent
steps.
0: The sample will sound at the original pitch when the
original key is played.
–: The pitch will be lowered. At a setting of –12.00 the
pitch will be one octave lower.
+: The pitch will be raised. At a setting of +12.00 the
pitch will be one octave higher.
You can also use “Pitch” to make fine adjustments in
the length of a rhythm loop. For example with a setting
of +12.00, the playback speed will be doubled, and the
loop playback time will be 1/2. (Program, Sample
Parameters: Pitch)
Note: The “Pitch BPM Adjust” page menu command
lets you set the playback time in terms of a BPM value.
Constant Pitch
On (checked): All notes in the zone of the index will
sound at the pitch of the original key. Use this setting
when you have sampled a drum sound or a rhythm
loop, and want it to always playback at the original
pitch.
Off (unchecked): The pitch will change in semitone
steps, based on the original key. Use this setting when
you have sampled a musical instrument sound etc. and
would like to play it conventionally from the
keyboard.
Insert
This creates an index. When you press the Insert
button, a new index will be created according to the
“Position” setting (0–1e, 3–1c). At this time, the
contents of the index that was cut or copied by “Cut”
or “Copy” (i.e., the “Zone Range,” “Original Key
Position,” Level and “Pitch”) will be assigned at the
same time. (The sample will automatically be copied or
assigned to a different number.)
If it is not possible to create a new index when you
execute “Create” or “Insert,” a dialog box will
appear. If this occurs, see “Create” (0–1b).
If you have not yet executed “Cut” or “Copy,” such
as immediately after power-on, the new index will
be created according to the Create Zone Preference
settings (0–1e, 3–1c) “Position,” “Zone Range,” and
“Original Key Position.”
Cut
This deletes the selected index. At the same time, the
contents of the deleted index are copied to the “Insert”
buffer.
Copy
This copies the content of the selected index to the
“Insert” buffer.
Create
This creates an index. When you press the Create
button, a new index will be created according to the
settings of “Position,” “Zone Range,” and “Original
Key Position” (3–1c, 0–1e) (0–1b).
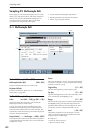
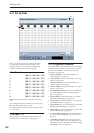
3–1c: Create Zone Preference
Position [Right (to Selected Index),
Left (to Selected Index)]
Zone Range [1 Key…127 Keys]
Original Key Position [Bottom, Center, Top]
Here you can specify the default settings for indices
that are created by executing “Create” (3–1b, 0–1b).
New indexes will be created according the settings you
specify here. You are free to modify the settings of an
index later. Also, when you execute “Insert” (3–1b), the
“Position” setting specified here will be used. (Create
Zone Preference: 0–1e)
▼ 3–1: Page Menu Commands
The number before each command shows its ENTER +
number-key shortcut. For more information on these
shortcuts, see “ENTER + 0-9: shortcuts for menu
commands” on page 138.
• 0: Delete Sample. For more information, see
“Delete Sample” on page 615.
• 1: Copy Sample. For more information, see “Copy
Sample” on page 616.
• 2: Rename Sample. For more information, see
“Rename Sample” on page 616.
• 3: Move Sample. For more information, see “Move
Sample” on page 616.
• 4: Sample Mono To Stereo. For more information,
see “Sample Mono To Stereo (Change Sample
Type)” on page 617.
• 5: Delete MS. For more information, see “Delete
MS (Delete Multisample)” on page 617.
• 6: Copy MS. For more information, see “Copy MS
(Copy Multisample)” on page 618.
• 7: Rename MS. For more information, see “Rename
MS (Rename Multisample)” on page 618.
• 8: Move MS. For more information, see “Move MS
(Move Multisample)” on page 619.
• 9: Convert MS To Program. For more information,
see “Convert MS (Multisample) To Program” on
page 618.
• 10: MS Mono To Stereo. This will appear only if
the current MS is Mono. For more information, see