Sequencer: Page Menu Commands Audio Event Edit
539
The procedure is the same as for “Region Edit.” The
region will be changed when you press the OK
button. If you press the Cancel button, the region
will not be changed.
If stereo pairing is enabled and you’re editing a
stereo audio event, the dialog box will appear twice.
In the second dialog box, select the region for the
other paired track.
6. Use the buttons located at the bottom of the dialog
box to edit the event.
• Inserting an event
Select the event that follows the location at which
you want to insert, and press the Insert button. If
you press the Insert button without having
previously used the Copy button or Cut button to
load audio event data into the copy buffer, only the
first Select Region dialog box will appear; select the
region that you want to insert as described in step 5,
and then press the OK button. Press the Cancel
button if you decide not to insert. (See
• Deleting an event
Select the event that you wish to delete, and press
the Cut button to delete the event.
• Moving an event
You can use the Cut button and Insert button to
move an event (by “cut and paste”).
Use the Cut button to delete the event that you wish
to move, then use the Insert button to insert it at the
desired location.
• Copying an event
Select the event that you wish to copy, and press the
Copy button. Then select the copy destination and
press the Insert button to insert the event at that
location.
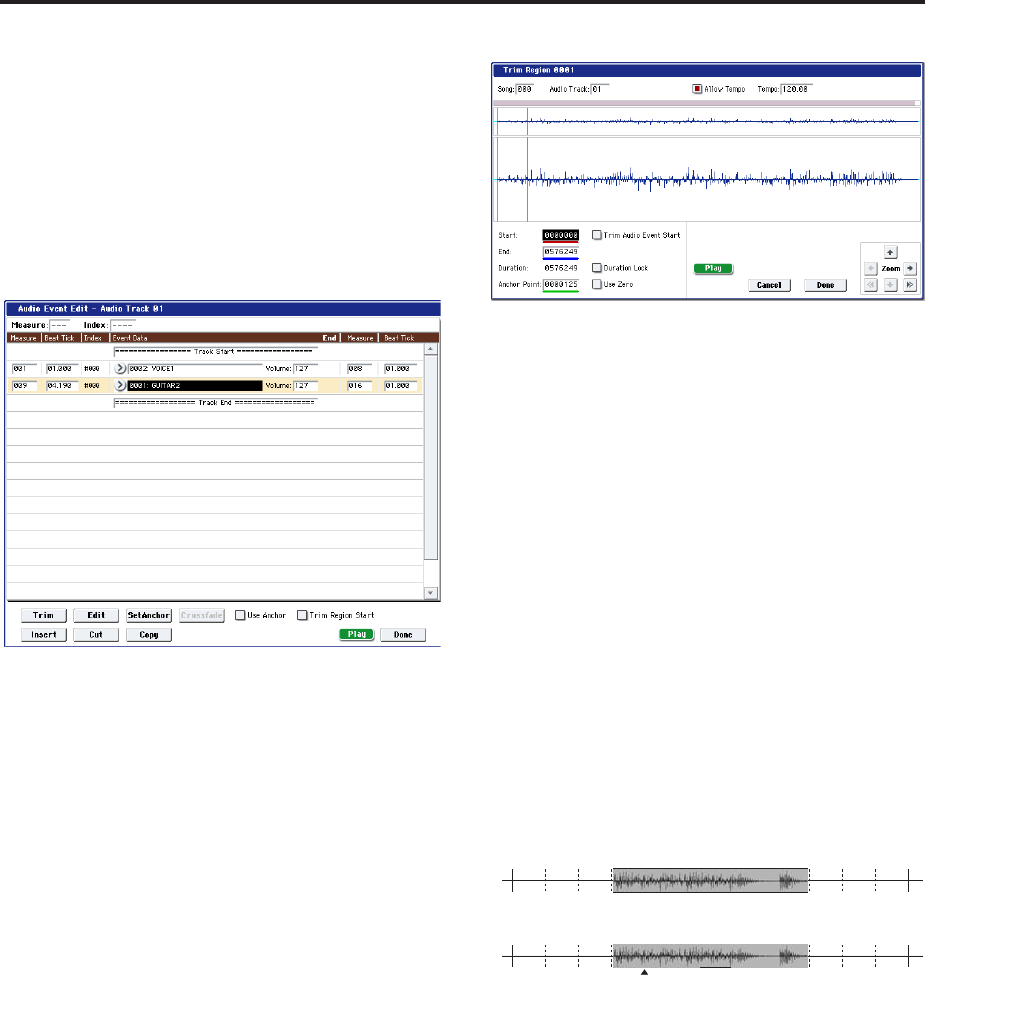
7. “TRIM”: This edits the area in which the region
will sound.
Select the region that you want to edit, and press the
Trim button to open the Trim dialog box.
The functions and operation are the same as in the
trim dialog box of “Region Edit,” with the exception
of “Trim Audio Event Start.” (See “Region Edit” on
page 550.)
If you check “Trim Audio Event Start,” editing the
“Start” value will simultaneously modify the
location (Measure and “Beat Tick”) of the audio
event. Check this option if you want to adjust the
length without changing the position at which the
entire event will sound. This will operate in the
same way as if “Trim Region Start” is checked in
step 4.
The region will be modified when you press the
Done button. If you press the Cancel button, the
region will not be modified.
8. “Set Anchor”: This sets the anchor point at the
beginning of the first measure from where the
audio event is placed.
Select the event that uses the region in which you
want to specify an anchor point, and press the Set
Anchor button. For more about how to use anchor
points, refer to step 4.
Note: If you want to edit the anchor point that is
automatically set here, use TRIM to make
adjustments in units of samples.
Tip: For example, you can specify the anchor point
as the starting location of a region. Then you can
turn on “Use Anchor,” and easily place that phrase
at the beginning of another measure.
9. Edit the waveform data of the WAVE file assigned
to the region.
Select an event that uses the region you want to edit,
and press the Edit button to open the edit dialog
box.
Measure
004 005 006 007
Anchor=Off
Edit: Set Anchor
M=005, BT=01.000
Anchor=Off
M=004, BT=04.000
Anchor
Point


