


Combination mode
334
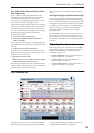
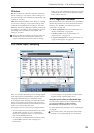
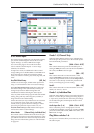
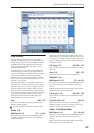
Control Assign Switches and Tabs
You can switch the Control Surface between its
different functions using either the tabs on the left side
of the LCD display, or the front-panel Control Assign
switches. The tabs and the front-panel switches mirror
one another; when you change one of them, the other
changes as well.
In Combi mode, you can select one of five different
functions:
TIMBRE/TRACK lets you adjust the volume, pan, EQ,
and send levels for each of the 16 Timbres, eight at a
time. The LEDs to the right of the switch show whether
you’re currently editing Timbres 1–8 or 9–16; press the
TIMBRE/TRACK button to toggle between the two.
If you switch to one of the other Control Assign modes,
and then go back to TIMBRE/TRACK, it will
automatically return to the previously selected group
(1–8 or 9–16).
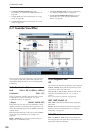
AUDIO INPUTS lets you adjust the volume, pan, and
send levels for the analog and S/P DIF audio inputs. In
Sequence mode, you can also use this to select two
banks of hard-disk recording tracks, as shown by the
LEDs to the right of the switch.
EXTERNAL lets you send MIDI messages to external
MIDI devices.
R.TIME KNOBS/KARMA lets you modulate sounds
and effects with the knobs, and control KARMA with
the sliders and switches.
TONE ADJUST lets you edit Programs within the
context of the Combi, and without making any
changes to the original Program data. You also get
hands-on access to these edits, using the sliders, knobs,
and switches.
You can freely change back and forth between the
different functions, without losing any of your edits.
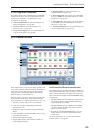
Control Assign switches
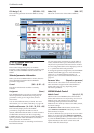
Front-panel LEDs for sliders and knobs
There’s a vertical column of LEDs next to each slider,
and a ring of LEDs around each knob. Similarly, each
of the switches has an LED to show whether it’s on or
off.
As you switch between the different Control Assign
settings, you’ll notice that the LEDs change to show the
current values for all of the controllers.
You can edit these values using either the physical
sliders, knobs, and switches, or by selecting the on-
screen parameters and using the standard data entry
controls. When you edit a value using the LCD and
data entry, you’ll notice that the LEDs on the sliders,
knobs, and switches reflect the change as well.
Jump/Catch
When you change the Control Assign setting, the
physical position of the knobs or sliders may be
different than the parameter value, as shown by the
LEDs.
The Knob/Slider Mode parameter, under System
Preferences on the Global mode Basic page, determines
how and when moving the physical slider or knob will
start to edit the parameter value.
When it is set to Jump, the parameter will snap to the
physical position as soon as you start to move the knob
or slider. Use this if you’d like the parameters to
respond instantly to controller movements.
When it is set to Catch, you need to move the slider or
knob so that it “catches” the parameter, by passing
through its current value. Until the value is caught,
moving the slider or knob has no effect on the
parameter. Use this when you’d like parameter edits to
be smooth, and always move from the current value.
Reset Controls
The front-panel RESET CONTROLS button lets you
recall the stored settings for any slider, knob, or button
on the control surface.
Resetting a single control
To reset individual controls:
1. Hold down the RESET CONTROLS button.
2. While holding down RESET CONTROLS, move a
slider or knob, or press one of the control surface
buttons.
The slider, knob, or button will be reset to the value
stored in the Combi.
3. When you’re done, release the RESET
CONTROLS button.
Resetting a group of controls
To reset a group of controls at once:
1. Make sure that the Control Surface is showing the
parameters you want to reset.
As a safety precaution, you can only reset the
parameters currently displayed on the Control Surface.
This takes into account both the current Control Assign
setting, and the MIXER KNOBS button.
For instance, if you want to reset the volume and pan
for Timbres 1–8, make sure that Control Assign is set to
TIMBRE/TRACK 1–8, and that MIXER KNOBS is set
to INDIVIDUAL PAN.
2. Hold down the RESET CONTROLS button.
3. While holding down RESET CONTROLS, press
the current Control Assign button again.
All of the sliders, knobs, and switches shown on the
Control Surface will be reset to the values stored in the
Combi.
INPUTS
HDR 1-8
HDR
9
-1
6
6