


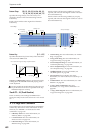
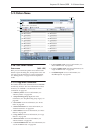
Sequencer mode
490
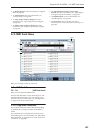
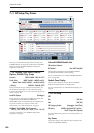
5–1b: Pattern, Pattern Select, Metronome,
Remove Data
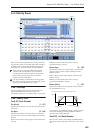
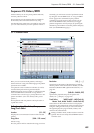
How to record a user pattern
1. Use “Song Select” to select the song in which you
want to create a user pattern.
2. Use Track Select to select the sound that you will
record.
The pattern you record will sound according to
your choice in Track Select.
3. Use Pattern Bank and Pattern Select to select User
pattern and the desired pattern number.
4. Select the page menu command “Pattern
Parameter,” and in the dialog box, specify the
number of measures and time signature of the
pattern.
5. Check the tempo in “”.
6. If you want to record in realtime, set “Resolution”
to specify the resolution, and press the
SEQUENCER REC/WRITE switch and then the
START/STOP switch to begin recording.
When you finish recording to the end of the
measures specified by “Pattern Parameter,” you will
return to the first measure, and can continue
recording while adding more material. For details,
see “Loop All Tracks” on page 429.
If you want to perform step recording, select the
page menu command “Step Recording (Loop
Type)” to open the dialog box, and record. For the
procedure of step recording, see “MIDI Step
Recording” on page 535 and “Step Recording (Loop
Type)” on page 554.
7. After recording, use the page menu commands as
desired to edit the pattern or the events in the
pattern.
Pattern (Pattern Bank) [Preset, User]
Selects the type of pattern.
If Preset is selected, it will not be possible to record.
You will be able to select and execute the “Copy
Pattern,” “Bounce Pattern,” “Put To MIDI Track,” and
“Copy To MIDI Track” page menu commands.
Pattern Select [P000…149, U00…U99]
Selects a pattern. User patterns can be renamed in the
P5– Pattern Name page.
Metronome [Only REC, REC & Play, Off]
Specifies whether the metronome will sound during
recording or playback. For details, see “0–5d:
Metronome Setup” on page 431.
Remove Data [Off, On]
On (checked): Unwanted performance data can be
removed during pattern recording. The procedure is
the same as explained in “Remove Data” of Loop All
Tracks. For details, see “Remove Data” on page 429.
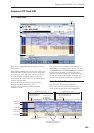
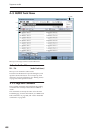
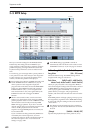
5–1c: USED IN SONG TRACK, USED IN
RPPR
USED IN SONG TRACK
This area indicates the pattern usage status for the
patterns selected for the track.
USED IN RPPR
This area indicates the RPPR in which the selected
pattern is used. The assigned key and the specified
track are shown.
▼ 5–1: Page Menu Commands
The number before each command shows its ENTER +
number-key shortcut. For more information on these
shortcuts, see “ENTER + 0-9: shortcuts for menu
commands” on page 138.
• 0: Memory Status. For more information, see
“Memory Status” on page 524.
• 1: Step Recording (Loop Type). For more
information, see “Step Recording (Loop Type)” on
page 554.
• 2: Event Edit. For more information, see “Event
Edit” on page 554.
• 3: Pattern Parameter. For more information, see
“Pattern Parameter” on page 554.
• 4: Erase Pattern. For more information, see “Erase
Pattern” on page 554.
• 5: Copy Pattern. For more information, see “Copy
Pattern” on page 554.
• 6: Bounce Pattern. For more information, see
“Bounce Pattern” on page 555.
• 7: Get From MIDI Track. For more information, see
“Get From MIDI Track” on page 555.
• 8: Put To MIDI Track. For more information, see
“Put To MIDI Track” on page 555.
• 9: Copy To MIDI Track. For more information, see
“Copy To MIDI Track” on page 556.
• 10: FF/REW Speed. For more information, see
“FF/REW Speed” on page 525