


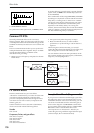

Disk: Page Menu Commands Write to CD
725
Write to CD
When this command is executed, the WAVE files
specified in the audio CD track list will be written as
audio CD tracks. If desired, you can also finalize the
disc at this time.
When writing data to CD-R/RW media, the media
containing the Wave files must have free space
equal in size to the Wave files you are writing.
Before you execute this operation, make sure that
the drive containing the Wave files contains enough
free space.
1. Create an audio CD track list, use “Drive Select” to
select the CD-R/RW drive, and make sure that CD-
R/RW media is inserted in the drive.
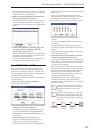
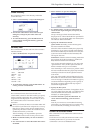
2. Select “Write to CD” to open the dialog box.
3. Use “Speed” to specify the writing speed. The
writing speeds supported by your CD-R/RW drive
will be displayed.
Be aware that if your system has a slower data
transfer rate, using an excessively fast writing speed
will produce writing errors. Depending on the drive
you are using, problems with the speed may make it
impossible to write, but you can perform a test
beforehand to identify such problems. It is a good
idea to perform a test write when you write for the
first time, to verify the speed limitations of your
drive.
If the audio CD track list contains WAVE files
located on an external USB 1.1 type hard disk,
writing errors may occur even if you specify the
slowest writing speed. If this occurs, copy the
WAVE files to the internal hard disk, and change the
audio CD track list so that it uses the copied WAVE
file located on the internal hard disk.
Use “Mode” to specify the writing method.
Test: Tests whether the data can be written correctly.
Data will not actually be written to the CD-R/RW
media, but all other processing will occur just as if
data were actually being written. Use this when you
want to check whether writing can be performed
correctly. If an error occurs, the display will indicate
“Error in writing to medium.”
Test and Write: A test write will be performed, and
if the test is successful, the disc will actually be
written. We recommend that you use this method
for fast writing speeds.
Write: The media will only be written.
4. Specify whether the CD-R/RW media will be
finalized after the audio CD tracks have been
written to it.
If “Execute finalize too” is checked, the disc will be
finalized.
If this is not checked, the disc will not be finalized.
Note: If you want only to finalize the disc, use
“Finalize Audio CD.”
5. Press the OK button to execute writing or test
writing to the CD-R/RW media, or press the
Cancel button to cancel without executing.
WAVE files with a 48 kHz sampling frequency will
be converted to 44.1 kHz when they are written.
In order for this processing to be performed, free
space of approximately the same size as the WAVE
file to be converted will be required on the drive
that contains the WAVE file. Before executing,
please make sure that the drive containing the
WAVE file has enough free space.
Note: If the track is shorter than 4 seconds, silence will
be automatically added to increase the length to 4
seconds.
Note: Two seconds of silence will be added to the end
of each track except the last track.
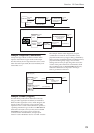
Finalize Audio CD
This command finalizes CD-R/RW media to which
audio CD tracks have already been written.
1. Use “Drive Select” to select the drive, and make
sure that the drive contains valid media.
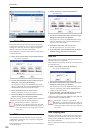
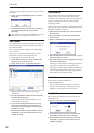
2. Select “Finalize Audio CD” to open the dialog
box.
3. Press the OK button to execute the Finalize
command, or press the Cancel button to cancel
without executing.
Erase CD-RW
This command erases the audio CD tracks from CD-
RW media.
1. Use “Drive Select” to select the drive, and make
sure that it contains data.
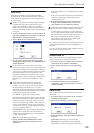
2. Select “Erase CD-RW” to open the dialog box.
3. Select the mode by which the audio CD tracks will
be erased.
Quick Erase: Normally you will select this.
Full Erase: The data will be erased completely.
Substantial time will be required for the erasure.